4.5.4 使用指南
ER Diagram Renderer
用 er-diagram-renderer 把資料庫 schema JSON 畫成有導覽樹、Wiki 與關聯圖的資料庫文件,也能嵌進筆記內文。
本頁目錄
ER Diagram Renderer(id er-diagram-renderer,目前版本 1.2.0)把一份描述資料表、欄位與外鍵的 JSON,畫成三部分:左側導覽樹、Wiki 文件頁,以及可縮放的實體關聯圖。需要 NoteCraftApp 0.6.0 以上。
安裝與映射
npx notecraftapp install-plugin er-diagram-renderer --apply "**/*.er.json"--apply 會順便寫好映射規則。不帶的話,自己在 .notecraft/plugins.json 加一條:
{
  "plugins": [
    { "plugin": "er-diagram-renderer", "files": ["**/*.er.json"] }
  ]
}
慣例是資料檔以 .er.json 結尾,之後新增的檔案就會自動被接手。檔名本身沒有限制,files 也可以直接寫某個檔案的路徑。planning/orders.er.json 會變成 /view/planning/orders.er 這一頁。
安裝流程見安裝來源,規則寫法見映射規則 plugins.json。
資料檔格式
一份能 build 的最小資料檔:兩張表,orders.customer_id 指向 customer。
{
  "$schema": "https://raw.githubusercontent.com/SteveLin100132/notecraft/main/plugins/er-diagram-renderer/schema.json",
  "meta": {
    "title": "訂單資料庫",
    "description": "訂單模組的資料表。先看 `customer`,再看 `orders`。",
    "backTo": "/notes/orders/overview"
  },
  "requirement": [
    { "key": "required", "label": "必填", "marker": "solid" },
    { "key": "nullable", "label": "可空", "marker": "hollow" }
  ],
  "flags": [
    { "key": "pk", "badge": "PK", "tone": "danger", "label": "主鍵" },
    { "key": "fk", "badge": "FK", "tone": "info", "label": "外鍵" }
  ],
  "derivations": [],
  "groups": [{ "key": "order", "label": "訂單" }],
  "layout": { "columns": [{ "key": "c1", "groups": ["order"] }] },
  "tables": [
    {
      "name": "customer",
      "label": "客戶",
      "group": "order",
      "columns": [
        { "name": "id", "type": "bigint", "required": "required", "pk": true },
        { "name": "name", "type": "text", "required": "required", "note": "客戶名稱" }
      ]
    },
    {
      "name": "orders",
      "label": "訂單",
      "group": "order",
      "columns": [
        { "name": "id", "type": "bigint", "required": "required", "pk": true },
        { "name": "customer_id", "type": "bigint", "required": "required", "fk": "customer" },
        { "name": "memo", "type": "text", "required": "nullable" }
      ]
    }
  ]
}
$schema 那一行是選用的,加了之後編輯器能依 schema 檢查與補全。
頂層欄位
| 欄位 | 必填 | 說明 |
|---|---|---|
meta | title、description、source、backTo,見本頁最後一節 | |
options | 資料自帶的顯示設定,見下一節 | |
requirement | ✓ | 必填性的語彙,至少一項:key、label、marker(solid、half、hollow、muted 四種圓點) |
flags | ✓ | 欄位徽章:key 是 pk、fk、unique、index 之一,badge 最多 4 個字 |
derivations | ✓ | 衍生欄的種類(例如計算欄、由 trigger 維護),可以是空陣列 |
schemas | 導覽的第一層,例如 crm、sales。沒寫時導覽直接從分群開始 | |
groups | ✓ | 模組分群:key、label,選填 schema、description |
layout | ✓ | columns 決定關聯圖的欄與每欄由上而下放哪些分群,也決定導覽裡分群的順序 |
tables | ✓ | 資料表:name、label、group、columns,選填 section、description |
欄位(tables[].columns)
| 欄位 | 必填 | 說明 |
|---|---|---|
name | ✓ | 欄位名 |
type | ✓ | 型別,原樣顯示 |
required | ✓ | 填 requirement 裡的某個 key |
pk、unique、index | 布林值,顯示對應的徽章 | |
fk | 父表的 name。關聯線由它推導;指向不存在的表時略過那條線 | |
default | 預設值 | |
note | 欄位說明 | |
derivation | 填 derivations 裡的某個 key |
完整規格見 repo 裡的 schema.json,含 3 個 schema、14 張表的範例見 example/schema.json。
Wiki 說明可用的 Markdown
meta.description、schemas[].description、groups[].description、tables[].description 會出現在 Wiki 頁,支援的語法只有:##/### 標題、段落、-/1. 清單、> 引言、**粗體**、`code`、[文字](url)。表格、圖片、HTML 一律當文字顯示。
- 反引號裡恰好是表名,會連到該表;恰好是 schema 的
key,會連到該 schema。兩者撞名時表名優先,要明確指定就寫`table:customer`或`schema:crm` - 連結只接受
http(s):、mailto:、/開頭的站內路徑與#錨點,其他一律當文字
選項
options 可以寫在資料檔裡,也可以寫在 plugins.json 的規則上:
| 鍵 | 預設 | 作用 |
|---|---|---|
defaultRows | 6 | 關聯圖卡片預設顯示幾個欄位;主鍵與外鍵一律顯示、不計入 |
hubTables | [] | 被極多張表指向的共用表名稱,它們的連線預設收起 |
canvasHeight | 依情境 | 關聯圖畫布高度(px),最小 240 |
sectionPrefix | § | 表的 section 前面加的符號 |
hint | 一段操作說明 | 關聯圖上方的提示文字 |
searchPlaceholder | 搜尋表名或欄位名 | 關聯圖搜尋框的提示字 |
同名設定的優先順序由低到高:內建預設、資料檔的 options、plugins.json 規則的 options、<PluginView> 的 options。同一份資料被不同專案引用時,引用的一方可以覆寫。
頁面上能做什麼
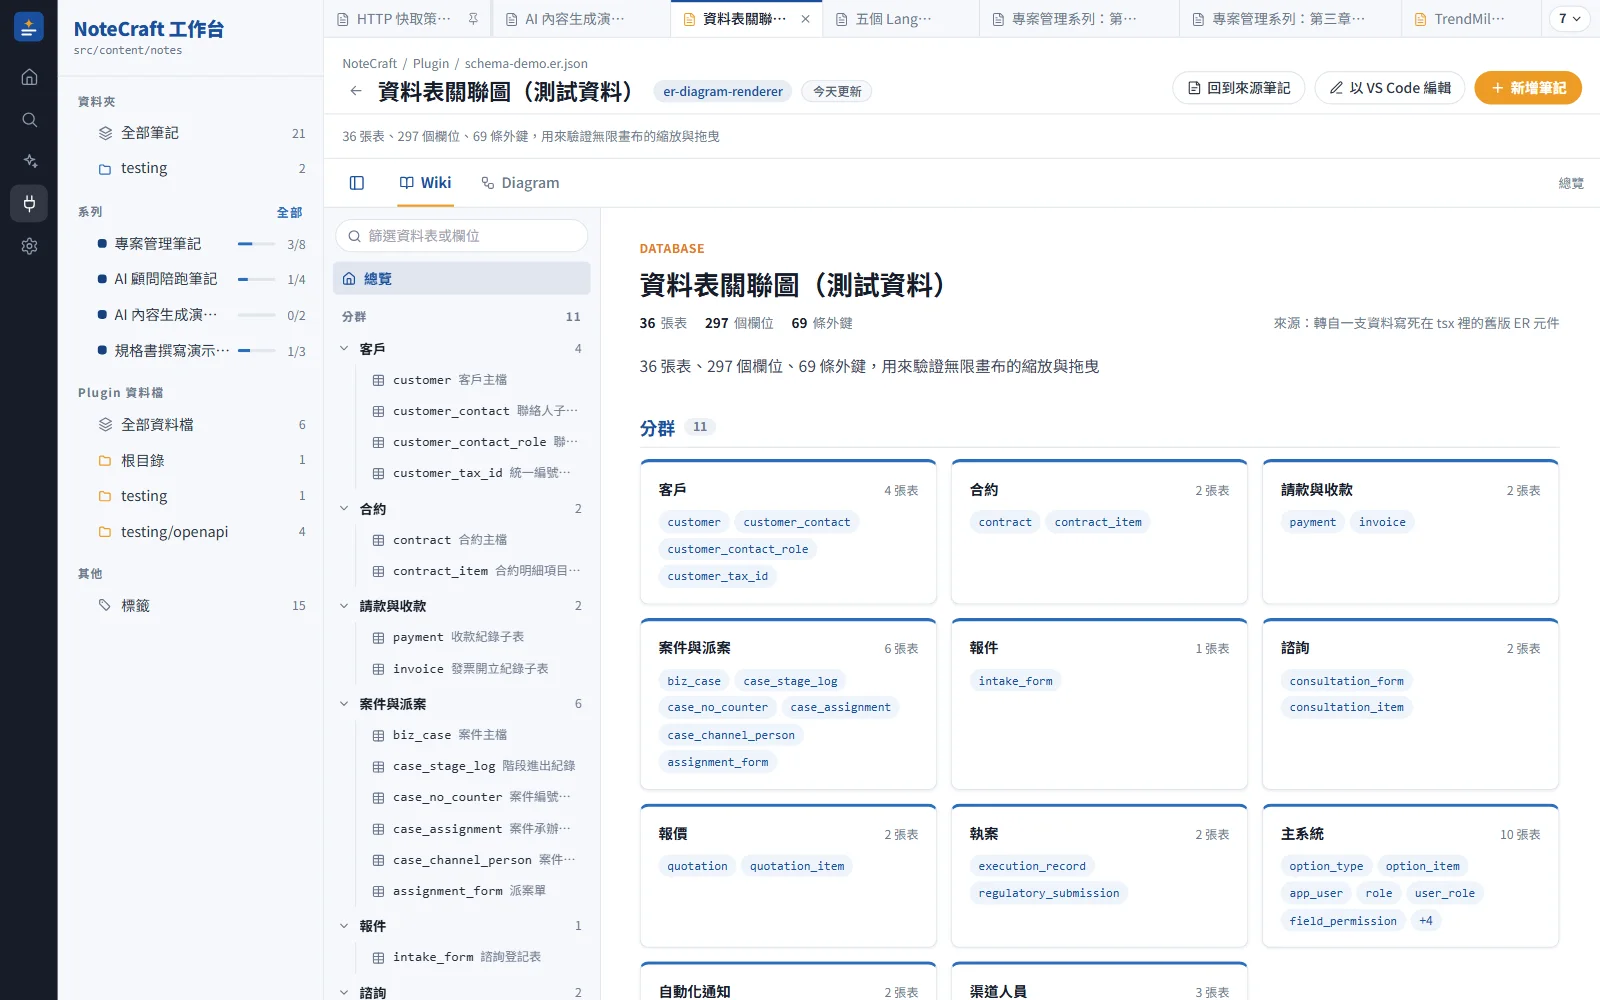
- 1Wiki/Diagram 分頁
- 2回到來源筆記
- 3導覽樹:篩選、分群、資料表
- 4總覽:統計與分群卡片
導覽樹
Schema → 分群 → 資料表三層,可以收合。上方的篩選框比對表名、表的 label 與欄位名,並顯示「命中/總數」。沒有寫 schemas 時省略 Schema 那一層。
Wiki 分頁
| 頁面 | 內容 |
|---|---|
| 總覽 | 標題、統計(schemas、表、欄位、外鍵數)、meta.description、各 schema 卡片、這份資料用到的語彙 |
| Schema | schema 說明,以及每個分群的說明與資料表清單 |
| Table | 表說明、欄位表(外鍵可以點到父表)、局部關聯圖(父表 ← 本表 ← 子表,各最多 8 張)、參照與被參照清單、索引與唯一鍵、衍生欄 |
description 全部選填,沒寫的地方顯示空狀態。
Diagram 分頁
- 縮放與平移:拖曳平移;
⌘/Ctrl+滾輪縮放,觸控板捏合也可以。單純滾輪會捲動頁面。雙擊空白處或按右下的還原鈕回到起點 - 聚焦:點一張表,它的父表與子表保持清楚,其他變淡,並列出指向幾張父表、被幾張子表指向。再點一次、點空白處或按
Esc取消 - 搜尋:比對表名、
label與欄位名,顯示命中數;命中欄位的表會自動展開 - 展開欄位:卡片只顯示
defaultRows個欄位,點「展開全部 N 欄」看完整欄位 - 範圍:有寫
schemas時,可以只畫某個 schema 的表;跨範圍的連線不畫,但會註明有幾條 - 共用表連線:
hubTables的連線預設收起,有一個開關可以顯示
Wiki 與 Diagram 互相跳轉:Table 頁有「在 Diagram 聚焦」,聚焦列有「開啟 Wiki」。
記住上次的位置
目前看的頁面、分頁與範圍存在瀏覽器,依資料檔分開記,重新整理會回到原處(先閃一下總覽再跳過去)。資料改名後對不到的位置會回到總覽。這個 plugin 不使用網址 hash。
鍵盤操作見快捷鍵的「ER Diagram Renderer」。
嵌進筆記
import PluginView from "@/components/PluginView.astro";

<PluginView src="planning/orders.er.json" caption="訂單模組的資料表關聯" />
內嵌和 /view/ 頁的差別:
/view/ 頁 | 內嵌 | |
|---|---|---|
| 高度 | 隨內容長高,分頁列與導覽黏在頂端 | 固定 580px 的框,窄螢幕會再縮 |
| 導覽樹 | 預設展開 | 預設收起 |
| 全寬 | — | 「展開全寬」攤開整個外殼,「回到本文」收回 |
- 內嵌和
/view/頁各自記住上次的位置,互不影響 options可以逐處覆寫,例如options={{ defaultRows: 10 }}anchor對這個 plugin 沒有作用,因為它不讀網址 hash- 外框的「開啟完整檢視頁」與放大檢視由 NoteCraftApp 提供,見映射規則 plugins.json
meta:標題、描述與回到筆記
| 欄位 | 用在哪裡 |
|---|---|
meta.title | 頁首標題、瀏覽器分頁標題、頁籤與指令面板,也是 Wiki 總覽的大標。沒寫時頁首用檔名 |
meta.description | Wiki 總覽的內文(Markdown)。頁首與清單只取第一段的純文字,站內搜尋收全文 |
meta.source | Wiki 總覽顯示「來源:…」,記錄這份資料整理自哪裡 |
meta.backTo | 頁首出現「回到來源筆記」按鈕,連到這個路徑 |
backTo 只接受 / 開頭的站內路徑,例如 /notes/orders/overview。寫成完整網址或 //host 會被忽略,build 時印警告,不會失敗。